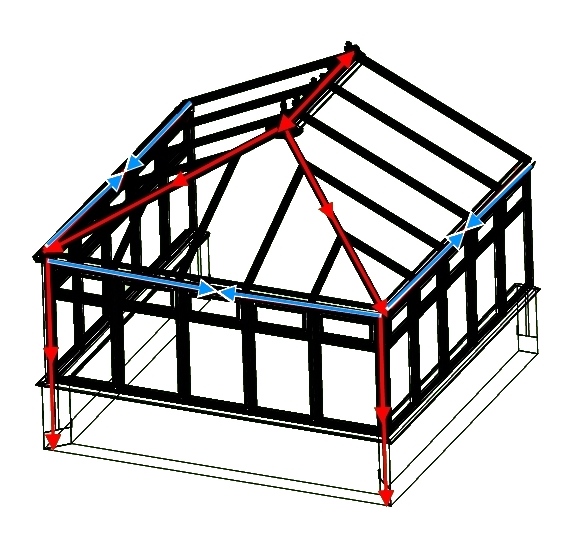
When a tie bar is located under the finial point it provides a rigid support to that end of the ridge. If no tie bar is there, the hip bars support the end of the ridge instead. This puts the hip bars in compression.
These push outwards at the external eaves corner connection. As a result of this the eaves beams down each side of the conservatory are now trying to pull away from the house wall. To maintain an equilibrium of forces,
the ridge must therefore go into compression and pushes against the house wall.
These forces are shown graphically in the diagram right.
Diagram of the forces and load paths when a roof without a tie bar is loaded (downward load)
– compression in red, tension in blue -
To ensure compression is achieved, you must ensure the following procedures are followed.
Fixings into the host wall:
The type of fixings required when installing a conservatory is entirely the responsibility of the installer. Brick, block and masonry substrates vary widely in quality,
the performance of an anchor primarily depends upon the integrity and strength of the substrate material into which it is fixed. In general, the stronger the substrate the greater the load before failure.
There are two typical kinds of load to consider. The first is tensile load, also described as ‘pull-out’ where a force would be required to pull a fixing out of its hole i.e. along it’s axis.
The second is shear, where the force is at right angles to the fixing.
Torque controlled expansion anchors are far superior in performance than ‘hammer- in’ screw fixings, being typically in excess of 10x stronger for the same diameter.
The starter or wall plate bars require a positive fix at several points i.e. in close proximity to the eaves beam & ridge &
at regular centres in between, the spacing are dependent on the type & condition of the wall. Weak, badly situated or insufficient fixings could fail & be pulled from the wall causing the frames/ eaves beam
to be pushed forward & allowing the ridge to drop.
Eaves beam Cleats
The eaves beam, when connected together creates a continuous ‘ring’, which supports the glazing bars & ridge & allows the roof to stand up.
It is of paramount importance that the cleats are fixed correctly during installation using the fixings provided. Failure to do this will seriously compromise the structural integrity of the roof.
Any force applied to the eaves beam joints, for instance through glazing bars could result in the joints opening up & allowing the ‘hipped’ glazing bars to move forward & therefore allowing the
ridge to drop. See installation guide page 7.
Bolts
It is essential the bolts that connect the glazing bars to the eaves beam are tight, particularly those which connect the starter bars and the hips.
Ridge
Ensure that the ridge body is packed away from the house wall.When the ridge is packed off the host wall, it will transfer the loading force from the ridge down
the hips (placing them into compression) and down into the eaves beam. If this is not followed then the side and front glazing bars will go into compression and force the frames out.
Above shows two roofs that have gone in to compression correctly.
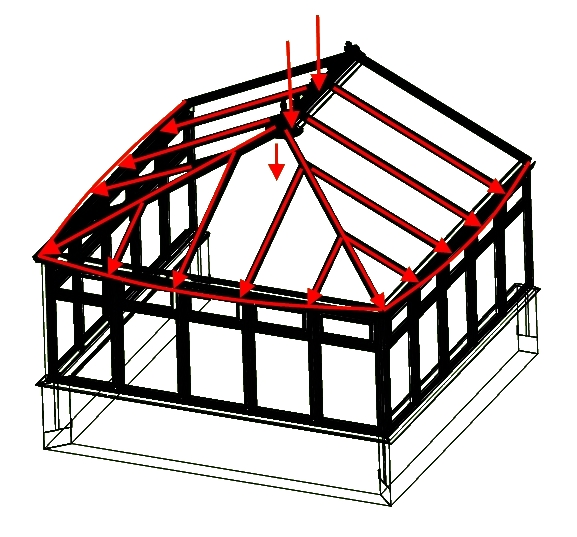
The above diagram shows a roof that has not achieved compression. This shows the weight of the roof baring down on all the glazing bars around
the roof and this will in turn will pull the eaves away from the wall and force the frames to bow out.
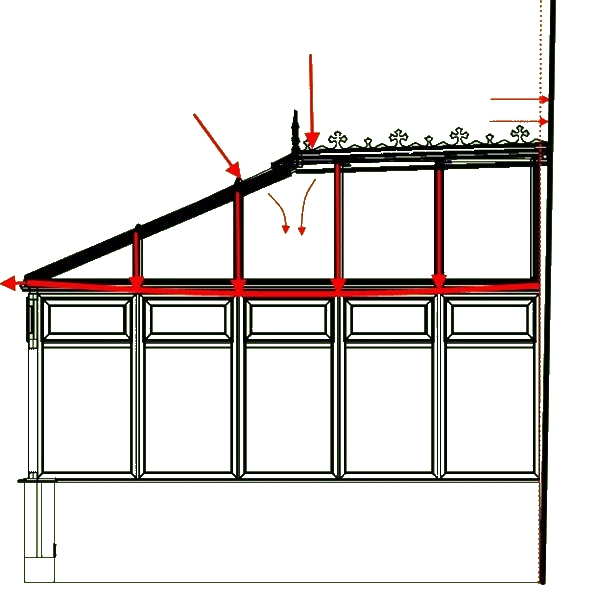
The above diagram shows the host wall leaning slightly back. Due to this, the ridge will be sat slightly behind the ridge body which in turn will allow the front finial point of the ridge to dip.

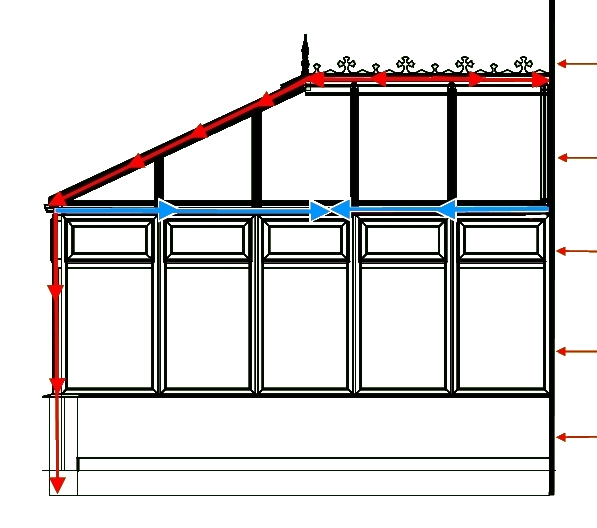 Above shows two roofs that have gone in to compression correctly.
 The above diagram shows a roof that has not achieved compression. This shows the weight of the roof baring down on all the glazing bars around
the roof and this will in turn will pull the eaves away from the wall and force the frames to bow out.
The above diagram shows a roof that has not achieved compression. This shows the weight of the roof baring down on all the glazing bars around
the roof and this will in turn will pull the eaves away from the wall and force the frames to bow out.
 The above diagram shows the host wall leaning slightly back. Due to this, the ridge will be sat slightly behind the ridge body which in turn will allow the front finial point of the ridge to dip.